Marx Foods Citrus Juices and a Mocktail to make with them

I love seltzer water, especially when the weather is turning warm and my porch is cleared of the winter’s detritus.  There’s something so refreshing about sipping a lightly sparkling drink that is enhanced by a squeeze of fresh citrus juice and some ginger that I find sinful on Spring days when the sunset is lingering and the trees are bursting into life again.  This is a mocktail that I created for those evenings that linger when the kitchen is warm and you just want to sit on the porch and read.

A friend was recently up for a blogger challenge over on the Marx foods website, so I went to give him my support by clicking a button and then I was caught in a website FULL of fabulous gourmet goods that I hadn’t heard of.  I checked out the Marx blog and wandered over everything until I stumbled across a blogger offer – for juices.  Three of them – Yuzu Juice, Kabosu Juice, and Sudachi Juice.  They were all foreign to me and looked decadent in their squat brown bottles.  I emailed the PR guy (Justin) and asked for a sample – at worst I wouldn’t like them right?

I liked them, all three of the juices offered a variation on lime juice – fairly sour but with subtle undertones.  In my naivete I had assumed these juices would be palatable for sipping – they were not, unless you can sip lime juice or have a miracle berry.  But they were delicious, and offered a depth of flavor that plain lime juice lacks.

The Yuzu had a bright lime flavor with undertones of tangerine (oh yeah, i’m about to get all taster snobby here, it’s kinda fun and silly).  I want this juice in vinaigrettes on fruit salads.  The Kabosu juice seemed to be the sweetest of the three.  I like it for it’s lemony flavor with a fantastic aftertaste of cantaloupe – yeah cantaloupe, it had that honey melon flavor.  Totally Decadent.  There’s a reason this was the juice to grace my mocktail.  And then there was the Sudachi.  This was my least favorite of the three juices, it is very tart and I found it hard to separate any other flavors over the tartness.  Maybe in a simple syrup it would be better?  Maybe?  I felt like I was sucking on a lemon with some grapefruit juice thrown in there to taunt me with another flavor.  It lacked the depth of flavor that I found with the other two juices.

I suppose you could add a bit of your favorite vodka to this drink to make it more of an adult soda – but why would you tamper with a good thing?  And with no alcohol you can feel decadent without going overboard when you drink this on a hot saturday afternoon and read from your newest obsession.

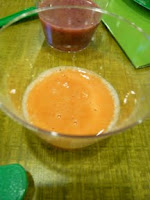
Kathy’s Ginger-Kabosu Soda
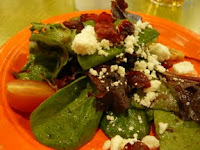
Note:  I’ve been adding these juices to a lot of things where I would regularly add lime or lemon juice but this soda is my favorite, and garnished with the fine slices of kumquat and a shave of ginger these were dressed up from refreshing to classy enough to serve at a dinner party.

1 Thumb sized nub of ginger, peeled and thinly sliced into coins
1/3 cup sugar
1/3 cup water
6 oz Club Soda
2 oz Kabosu Juice (If you can’t use that Lime would work too)
Ice
1 Kumquat cut into rounds, for garnish (optional)

In a small saucepan bring the ginger coins, sugar and water to a boil.  Allow them to simmer gently until the sugar dissolves – 2 minutes, maybe.  Remove the pan from the heat.  Let the ginger steep in the sugar water fro at least 5 minutes – more time will make the ginger flavor stronger.  Strain the ginger out of the syrup when the ginger flavor has saturated the syrup enough.  Reserve this ginger for garnish.  Let the syrup cool.  In a pint glass, combine the ginger syrup, Kabosu juice and club soda.  Stir Gently.  Add ice if you like.  Garnish with slices of kumquat and some of the candied ginger from the syrup.  Enjoy while sitting on a deck in the sunshine, reading, or playing a video game.

I was given these juices to try and review for free by Marxfoods.com, but all opinions and comments are my own.

Passover Challenge: Flourless Chocolate Cake with Salted Caramel Sauce

A while ago twitter was all abuzz about a passover potluck and it sounded amazing.  I wanted in and immediately started to plan my Seder challenge meal with the salt of the plate by creating a Flourless Chocolate Cake with Salted Caramel Drizzle.  I immediately emailed Cara saying I was in and what I was bringing; she has a great description of the meaning of the Seder plate over on her blog if you want to learn more (after all, Knowledge is Power!).  I ended up (sadly) missing Cara’s Seder potluck, but I still made the cake because, regardless, we all need a little more chocolate in our lives, right?  Then I searched for my flourless chocolate cake recipe – which is sort of like trying to find a needle in a haystack (my loose recipes are about 6″ of stacked paper and in no semblance of order… someday I’ll work on that).

The recipe I wanted was a symphony to dark chocolate – a pound of chocolate, espresso, eggs, butter, and sugar in a single bowl mixed.  So Simple and So Delicious.  I love rich, dark, chocolate decadence but I can only take it in small portions so I make this cake once or twice a year, if I’m even motivated for that.  I have friends who can’t “do” gluten so I try to accomodate them, and most of the time succeed, which is how I came to hunt for this particular gem in the first place.  I know two people that should avoid the binder that we all know and love and it is with them in mind that I try to go “gluten free” occassionally here on the blog.

Now, this cake; the first time I made it was with a lovely raspberry coulis that was bright and tangy to cut the richness of the cake. This time I made a dark, intense caramel that married with the flavors of the cake in an entirely different way, making each bite more decadent than the last.  It’s quite a lot like eating a well-made candy bar, but without the hassle of having to bite on the chocolate; this cake just melts away, leaving you with an urge for a big glass of milk or some sharp and well-spiced tea.

Kathy’s Flourless Chocolate Cake with Salted Caramel Drizzle
Note: This cake is rich and dense; plan to eat small pieces of it at a time.  Having a sauce to drizzle over it makes it less intensely rich.  I also have a tendency to use the darkest chocolate I can find without it being unsweetened so if you used something less dark, it could be less rich.  Either way, it’s delicious in a celebratory way, and it’s surprisingly quick to mix but takes some time to cook.

Flourless Chocolate Cake
1 lb of semi-sweet chocolate, chopped into coarse hunks (I recommend at least 55% cocoa since this really needs the fat)
1/2 cup sugar
1 cup brown sugar
3/4 cup espresso
16 Tbs (2 sticks) butter, softened and cut into 1 Tbs pieces
2 Tbs cocoa powder
8 eggs
1 Tbs vanilla

Preheat your oven to 350 and grease a 9″ springform pan with butter. Line the bottom of the pan with parchment paper.  In the large bowl of a food processor, pulse your chocolate until it is a coarse crumb texture – this take about a minute.  Add the sugars and pulse until everything is an even, sandy texture.  Turn the food processor on and gently stream in the HOT espresso; this will melt the butter and allow the whole thing to come together.  Allow this to run for a couple of minutes to make sure it’s smooth and the chocolate is fully melted.  Add the cocoa powder, then the butter pieces one at a time to the running food processor.  Process until smooth and fully incorporated – about 30 seconds.  Add the vanilla.  Add the eggs one at a time, pulsing the FP between each egg to incorporate them fully.  Pour the mixture into the lined and greased springform pan.  Place the springform on a cookie sheet (in case of leakage) and bake for 50-60 mins.  The top of the cake will be puffy and a little cracked when it’s done; the center of the cake will still jiggle a bit.  Pull the cake from the oven and set it on a rack to cool for at least an hour – if you don’t allow this resting period and try to pull the springform off early you will have crumbs; they’ll be tasty crumbs, but they’ll just be crumbs. After the cake has set up, remove the outer ring of the springform pan.  You can level the cake now if you would like to, or if you are like me, you can not worry about that and flip it onto a plate and watch the middle make a crater.  If you do level the cake, you should probably flip it over so the pretty side is facing up.  Chill it overnight or for at least 3 hours in the fridge.  Serve chilled and drizzled with copious amounts of salted caramel sauce.

Salted Caramel Sauce
Adapted from Smitten Kitchen
Note: Mine is darker than hers, I liked the “nuttier” flavor of the darker sugar and I added a little corn syrup to keep the caramel from crytallizing.  Since I wouldn’t eat all the caramel for a bit I wanted to be able to reheat and use it at my leisure – a little corn syrup made that easier.  If you are hesitant about corn syrup, David Liebovitz talks about it over on his site and you can see more there, but for all intents and purposes it can be left out here if you feel it should be.

1 cup sugar
1 Tbs light corn syrup
6 Tbs high quality salted butter. I used Kerrygold and it was divine!
1/2 cup plus 2 Tbs of heavy cream at room temp; fresher is better if you can get it.

Add the sugar and corn syrup to a medium sized sauce pan and whisk them while they gently come to a simmer over medium heat. This takes about 5 mins, sometimes less if it’s humid out.  Cook the sugar to a dark copper color (it’s better to have a light bottomed pan here so you can see the sugar change colors).  Whatever you do: DONT LEAVE YOUR SUGAR UNATTENDED, it’s a little twit and will burn if you walk away for even 0.2 seconds.  Remove the melted caramelized sugar from the heat and add the butter all at once, immediately.  This will simultaneously melt the butter and cool down the caramel enough to add the cream without it all siezing on you.  Whisk the sugar/butter mixture until everything is evenly distributed.  Add the cream all at once. The caramel will foam; it’s okay, that’s why you used a largish pan (you did use a largish pan right?). Continue to whisk the sauce until it all comes together.  Serve it immediately over your rich, dark, flourless chocolate cake or take it to the darkest corner of your apartment and eat it with a spoon while calling it “my precious” and… wait sorry, that’s not right.  You should probably try to share.  Everyone will love it after-all.  This stores for 2 weeks or so in the fridge. If you refrigerate it and find the caramel too firm, you can microwave it for about 30 seconds to soften it up again.

Baking for Bloggers Bake for Hope

Do you ever look at the delectable treats I blog and wish you could have them?  Now you can!  Well, you can have my Brown Sugar Sugar Cookies anyway.  With bidding from May 4-6 Boston/Mass based bloggers Cara and Jen have organized Bloggers Bake for Hope

Doesn’t that look like something you would love to have?  There are A LOT of local bloggers baking for this shindig too, so if caramel-ly delicious brown sugar sugar cookies don’t appeal to you maybe Amanda’s Cream Cheese Coffee Cake, Renee’s Cape Cod Cranberry tart, or some Sea Salt Nutella Fudge from Katie will.  I’ve got my eye on some Crusty Rosemary Sea Salt bread.  It’s all going to be fantastic and it’s all for a GREAT cause.  So go, bid and get someone you love something delicious (yourself included, since you love you too, right?).  I’m looking forward to giving away some of these cookies and hope that you’ll come bid on them when the bidding starts!

A Boston Blogger evening at UFood Grill

If you read other Boston based food blogs you will have noticed a flurry of blog recaps of a dinner at UFood Grill, a couple of weeks ago.  I was there that night.  These are my favorite things that I tried.  Even now, weeks later I still want one of those smoothies.  Enjoy.

     
The bistro salad was DIVINE. 
The UFood Unfries – they were fantastic and not FRIED.
Go UFOOD!

Steak tips – tender, delicious and paired with
 simply whipped sweet potatoes.  Bliss.
The UFood Turkey Burger – Moist and delicious
in ways I was not expecting.  Eat This!

             
YUM.  Smoothie.
This is the “Berrylicious”
Yum More Smoothie,
this time Passionate Peach
Wildberry Tart Frozen Yogurt – So Good!
I wanted it to be warmer out just so I could justify seconds

A couple of notes about UFood: they make a concerted effort to be health conscious in everything they make, most of the food is fantastic, they are accommodating, and they try to serve locally-sourced products!  I love that.  They were fabulous hosts, and even set out extra entrees that were full-sized for us to photograph.  They are a locally owned company that makes delicious “un-fries” on the go. What more do you want out of your fast food?  Now go UFood it up, have a smoothie and a turkey burger.  Bring me with you.
*This meal was entirely complimentary from Ufood Grill but all opinions posted here are my own.

Thai-Peanut and Black Bean Chili

I went to college in a minuscule town in Western Maine.  While school was in session it felt like there was a town of about 15k when school was not in session there were about 3000 people in the town.  My school was wonderful with small classes and professors who knew your first name it was the place you wanted to go after going to high school in an even smaller town, a stepping stone toward more.  But it was the town I was most enchanted with.  There was a cafe where I worked for a brief period, there were the brick structures of campus covered in English Ivy, there was the river I rode a giant blowup dinosaur named Lottie down one summer day – meandering slowly on it’s way somewhere I never went (Mexico, ME maybe?), and there was Soup For You.

In my senior year of college I took most of my classes on Tuesdays and Thursdays, in class until 4:15 or so on Thursday and then later that evening from 6-9.  So in that little interim period from 4-6 I always walked downtown to Soup For You, ordered one of the daily soups (there are always 6 – 3 vegetarian options and 3 omnivorous options) and a coffee and sat in a booth and read, or chatted with friends there.  It was one of my favorite semesters, and I always hoped for this soup to be on the menu, especially on warm spring days.

Maybe I loved Soup For You because it was charming – with hand painted tiles and quirky-ness everywhere, or because they knew that I loathed soup-spoons so always gave me one of the miniature ones they held behind the counter for little kids, but I think the biggest reason I loved it is that it was introduced to me by a community.  That community was full of some of the strongest women I’ve ever met, and I am still close with several of them now.  They were my coworkers in the Women’s and Gender Studies Center, a work study job that is by far the best job I’ve ever had.  We held potlucks together, went to lunch, stayed well past or scheduled times just to hang out, published a literary journal called Ripple that focused on women in writing, we wrote poetry and we read.  I associate this soup with those girls. 

My first day in the Women’s and Gender Studies Center saw me, terrified (as usual) meeting everyone and trooping around the grand (read 2 or 3 streets) downtown of our little college town when one of the girls piped up that there was Thai Peanut and Black Bean Chili and Soup for You and they probably still had Corn Muffins.  So we stopped.  We all ordered the same thing 8oz of the chili and a corn muffin, then we sat down.  The warm spring sunshine on our backs and excited about our upcoming events and the new issue of Ripple.  So this soup is camaraderie for me, it’s comfort somewhere new, and it’s friends and mentors.  It’s my history.  It’s also a Soup for You specialty and totally made the internet fail me.  So this is as close an approximation as I can get.  Eat it with friends and a corn muffin.

Soup For You inspired Thai-Peanut and Black Bean Chili
Note: I love this soup and would eat it every day if I could.  It’s also quite close to Soup For You’s version, which is so exciting to me, since I can’t find anything half as good in Boston.

Olive oil
1 Medium white onion, finely diced
1-2 cloves garlic, minced
1 Tbs Ginger Juice, or 2Tbs fresh grated ginger (I LOVE GINGER, you may not so go lighter on this if it’s not your flavor)
1/2 red pepper, finely diced
2-3 medium carrots, sliced thinly into coins
1 can full fat coconut milk
zest of 1 lime
zest of 1 lemon
2 cans of black beans, 1 drained and 1 with liquid
1/4-1/2 tsp red pepper flakes (use more, less, or none depending on the heat you like)
1/4 cup creamy peanut butter
1/2 cup dry roasted unsalted peanuts
handful of cilantro (optional)

In a large pot heat the olive oil over medium heat.  Add the onion, garlic, red pepper, carrot, and if you are using fresh ginger add that too and allow them to soften, stirring occasionally – this should take about 5 minutes.  Add the coconut milk and the zests and stir to combine.  Make sure you get everything in the pot evenly distributed throughout the coconut milk and allow the whole pot to come to a gentle simmer.  Add the black beans and red pepper flakes then allow the pot to come back up to a simmer, allow it to simmer like this for 10-15 mins.  Add the peanut butter and allow the chili to come to another simmer.  If you think your chili is a little thin you can add more peanut butter, but that is up to you, regardless stir the peanut butter in well – it s the star flavor here.  Add the dry roasted peanuts and let them cook for 10 minutes or so – you want them to be warm but still have crunch.  Serve the chili with a corn muffin on the side and a sprinkling of cilantro on top.  Don’t ever look back.  Its vegan and delicious.  Win.