French Onion Soup

I love carmelized onions.  I love the smell of them as they cook slowly in my kitchen and permeate my entire apartment with essence of onion.  They are wonderful.  I have been trying on and off for the past couple of years to make French Onion Soup; sometimes with mediocre results, sometimes with decent results, but nothing had that ‘wow’ factor.  That experience of trying French Onion Soup for the first time; something rich, decadent, and smooth, paired perfectly with a good crusty bread and those browned cheese bits that should always crust up the edges of the bowl or crock.  I stumbled across this recipe in the same Cook’s Illustrated: Soups and Stews issue that I found those heavenly drop biscuits.  After such consistent bad/mediocre luck with this soup, I tried this new recipe, thinking at worst I would only waste a few onions; no harm no foul.  It was perfect. Velvety and rich; I could have been back in the Paris cafe where I ate French Onion Soup and watched the square in front of me bustle in the late June evening. It was that good.

This does take some time to make, but most of it involves babysitting the onions while they infuse everything around you with their scent.  I made it on a cold day (actually it was the day before Boston Food Blogs officially launched) and again on our most recent snow day; it was a perfect winter warmer.  I love that I can precook the onions the night before I want the soup cutting my preparation time down to an hour or so the next day.  I also just love to watch that cheese bubble under the broiler. It’s so satisfying to pull out a perfectly browned and bubbly soup to serve a guest (or that boy that does really sweet things for you, like edit your blog posts).

This soup is now a house favorite and given the choice, BF will choose it as the Kathy-cooks-all-day option for dinner (if I am letting him choose something I’m willing to cook all day that is).  Also I think I may have converted my decidedly un-french-onion-soup-loving sister with this little wonder.

Kathy’s French Onion Soup
Adapted from Cook’s Illustrated: Soups and Stews pretty heavily.  I use red wine instead of sherry. Also, I use only chicken stock (more for convenience than any other reason) instead of their recommended beef and chicken combo.

3 Tbs unsalted butter
2 large leeks,washed and sliced into 1/4 inch rounds
4 medium yellow onions, peeled and sliced into 1/4 inche wide half moons
2 medium red onions, peeled and sliced into 1/4 inch wide half moons
8 cups of dark stock, I use a dark chicken stock, but you can use half chicken and half beef if you prefer
1/2 cup red wine
1 1/2 cup water
1-2 springs fresh thyme
Salt and pepper, to taste
4 slices good crusty bread (I’m obsessed with the Russo’s Rustic Artisan loaf, which is a nice ciabatta)
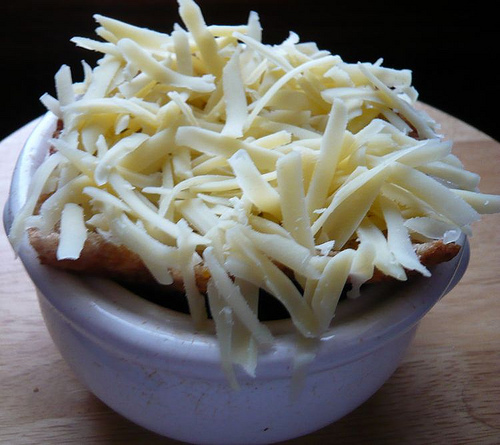
2 cups grated Jarlsburg cheese (You can use something else if you prefer just get full fat content and a softer grate-able cheese)

I just got a mandoline (and it was a super cheap one that isn’t terribly awesome) but it made the whole french onion soup process a lot less tedious, so splurge on yourself and get a mandoline, if nothing else than for onions.  Preheat the oven to 325.  Add the sliced onions to a heavy bottomed not non-stick (this is actually important) pot with the butter. I used my Le Crueset stock pot and it was perfect.

Put the pot full of onions and butter into the oven, covered, and leave it alone for 45 mins or so (if you forget for a few minutes, that’s ok; this step is really forgiving).  Pull the onions out of the oven and give them a quick stir; they should be starting to reduce in volume at this point and become translucent.  Put the pot back in the oven with the cover on a bit of an angle to allow steam to escape.  Leave it alone for another 30 minutes then pull it out and stir again; this time the onions should be starting to turn a nice golden brown. If you think they’re cooking too quickly go ahead and turn the oven down to 300 and if they are still just translucent (no golden color yet) go ahead and punch up the temp on your oven to 350.  Continue to cook and stir your onions in this way until they are a deep brown without actually burning, it takes between 2 1/2 and 3 hrs depending on the oven (Note: If you are pre-baking, let the onions cool and put the carmelized onions in the fridge until you actually want to put the soup together).

Once your onions are carmelized, put them on a medium burner on the stove top and allow them to build up a crust on the bottom of the pan (takes me 5-6 mins of stirring for this to happen without burning).  De-glaze these good crusty bit by adding the wine and scraping at the bits gently with the back of a wooden spoon; they should come right off with the wine.  Cook the wine down and get the brown onion crusty on the pan bottom again. This time de-glaze with water – about 1/2 cup.  Perform the water deglaze another 2 times to really make sure you get the full flavor out of the onions. 
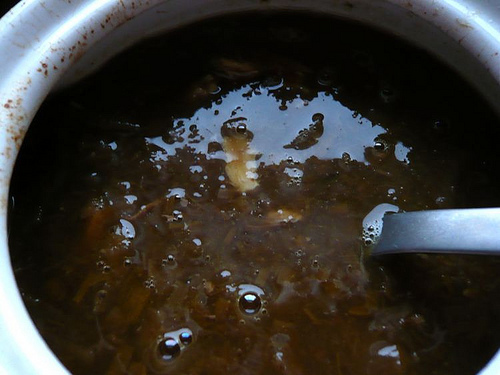
Add the stock and thyme to the deglazed onions and let it come to a simmer over medium-low heat.  Keep this low simmer for 20-30 minutes so that all of the flavors have an oppurtunity to meld.  Taste for salt and flavor; add salt if needed. Remove from the heat.

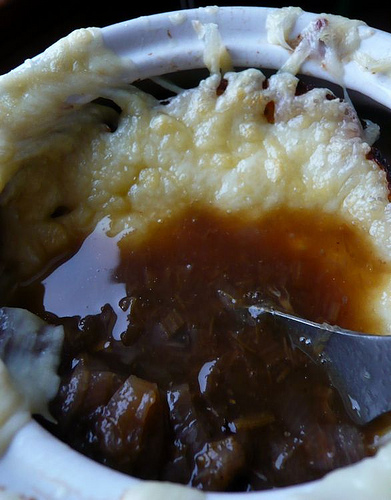
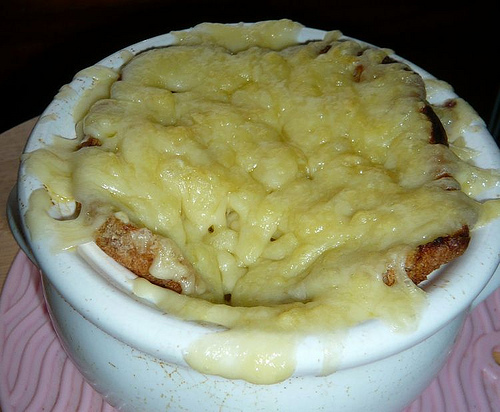
Toast four slices of your favorite crusty bread.  Ladle the soup evenly into heatproof crooks, lay the toast on top, and sprinkle 1/4 of the cheese over top.  Broil the whole she-bang for 5-7 mins until the cheese is bubbly and crispy brown. Watch it like a hawk; everything burns crazy-fast under the broiler, and burnt cheese is just not as good as browned and bubbly cheese.  Serve it with a spork.  Enjoy it with the rest of that bottle of red wine you opened; by now it should be prefectly aerated 🙂

Simple Lentil Chili

I’ve been posting a lot of heavy recipes recently: breads (like this one and this one), cream soups (like this one), and cookies.  And I know that it doesn’t make those New Year’s Resolutions that everyone is still trying to hold onto any easier, especially now that their shininess has worn off (my New Year’s resolution is to blog more, so far I have maintained my average of one post per week. Resolution fail).  But this recipe should help to get you back on the “healthy eating” bandwagon with its lack of added fat, and if you make it with vegetarian stock, it’s vegan!

I like cold weather because it leaves me with an urge for soups, stews, and chili (so. much. chili.)  which is great, BF loves all of these things – for the most part they fill us up quite well and are inexpensive, not to mention perfect snuggle-up eats.  Winter in New England always makes me wonder what it would be like to be a hermit permanantly; cozying up to my stove for the better part of the day and whiling away my evenings watching tv/playing video games with BF.  Wouldn’t that be the life?  Instead, I work a day job and have to fight icy sidewalks when I walk to and from work every day hoping that today isn’t going to be the day I have to walk to work in a blizzard (which has happened twice so far this winter).  This chili is an ode to staying warm after walking in a snowstorm to get in the door and collapse relieved on the floor in a puddle of snow boots and wet coats.  This is the reason I am excited to go home and eat.

There aren’t any pictures for this post (not from lack of trying mind you).  I’ve made this chili twice in the past two weeks and each time have been so excited about eating it I forgot to take pictures.  So there you go.  It’s kind of unpretty colors anyway, so no loss!  But it’s delicious, hearty and warming without any of that eating-lots-of-butter guilt; also it’s lentils so it’s filling and fast!

Simple Lentil Chili
Adapted (pretty heavily) from the Whole Foods website
Note: The WF version of this soup is vegetarian and wonderfully healthy, but I thought it was pretty bland so I added a bunch of extra spices (see below).  Also, if your stock is not homemade it may be pretty salty already so taste your chili before adding salt.

1 bag brown lentils (the dried ones that are in abundance at the supermarket)
1 onion, chopped medium-fine
1 sweet red pepper, chopped medium fine
3-4 cloves of garlic, minced (more if you like things garlic-y)
2 cans of diced tomatoes (I really like the fire-roasted ones!)
8 cups of broth or stock (I used chicken because I had it on hand, but whatever you have will work well)
2-3 Tbs Chili powder, to taste
1-2 tsp cumin
1-2 tsp worcestershire sauce (optional)
1/2 tsp salt, or more to taste or soy sauce (trust me)

Bring 1 cup of stock or broth to a boil over medium-high heat and add the onions and garlic.  Cook them in the broth until the onions are translucent; about 3 minutes.  Add the red pepper and cook it until tender, another minute or so.  Add the cans of tomatoes, the rest of the broth, and the spices (chili powder, cumin, and worcestershire sauce) and bring the whole pot to a low boil (another 5-7 minutes), stirring occasionally so the vegetables don’t stick.  Once your broth has reached a steady boil, add the lentils, stir to incorporate, and cover the pot.  Turn the heat down to medium low or low and simmer the whole thing, stirring about three times until the lentils are tender and plumped up (20-25 mins).  Try the chili now; if it needs some salt add a couple dashes of soy sauce or 1/4 tsp of salt.  If you need salt allow the soup to simmer for another 5-10 mins for the flavors to merge.  If you didn’t add salt take the chili off the heat.  Serve this chili topped with great gobs of sour cream, a sprinkling of chopped cilantro (if you like it), and some grated cheddar cheese.  It is happy in a bowl.  Real life.  Also, this dish is marvelously low-fat; well, that is, if you use low fat sour cream and cheese (though I never get low fat anything!).

Cheddar Broccoli Soup

flikr4

I love cheese. I love to eat anything with substantial amounts of cheese in it.  This soup is no exception to that rule.  It’s like mac and cheese, but without any of that finicky mac in the way ;).  As a child I remember being obsessed with the Cup-a-Soup Broccoli-Cheddar soup and at one point, within the past couple of years, I finally got to try it, to great dissatisfaction – this was one of the things I wanted out of this soup; that sense of perfect creamy-cheesy-perfection that comes with trying a cheese soup for the first time.

flikr1

I recently talked about my current love of soups, stews, anything hearty I can cook in a pot and have excess leftovers from; this was one of those soups.  It’s rich and creamy in all the right ways.  I made it when it was especially cold and icky outside, rainy and gross right at the end of November and BF loved it.  It warmed and filled us up. It was rich and thick –  a perfect accompaniment to Pie Pan Focaccia Bread.

flikr3

When I ate this soup as a child, from that little foil lined Cup-a-Soup packet, I thought it would be impossible to make, but as I finally got around to reading a recipe (Cabot Coop twitter feed was great for inspiration),  I realized just how simple it was.  A roux, some milk, stock, broccoli and cheese and there was magic, in the form of broccoli cheddar soup. Bliss.

flikr2

Broccoli Cheddar Soup
Adapted from Cabot Coop’s Broccoli Cheddar Soup
Note:  I recommend a sharp cheddar, but nothing that will overshadow the broccoli, or else the broccoli loses some of it’s sweetness. Also, I’m sure you could use low fat milk here, I just don’t because I prefer everything to threaten me with a coronary.

2 Tbs butter
2 Tbs flour
2 cups whole milk
2 cups shredded cheddar (I really like Cabot New York Style Sharp, a Monterey Jack is also very nice)
4 cups of stock (I used chicken, but vegetable is also delicious)
4 cups of broccoli, cut into bite sized pieces

Melt the butter in a large sauce pan and add the flour (make a roux).  Whisk the butter and flour together until they are fully blended (about 30 seconds).  Gradually add the stock until it and the roux are fully combined; this should take a minute or two.  Add the broccoli and the milk.  Let the whole mixture come to a simmer  and leave it there for 10-15 mins, until the broccoli is tender.  Add the cheese and stir, letting it melt and thicken the soup.  Using an immersion blender, regular blender, or food processor, puree one quarter of the soup (or more if you want it silky smooth and lush).  Serve immediately with grated cheese sprinkled on top.

Pie Pan Focaccia Bread

There’s something satisfying about having a quick and delicious go-to bread in the house.  This is mine.  I like fresh warm bread, as a snack or an accompaniment to a meal. Warm and fresh bread is delicious.  I don’t make my own pizza dough for this as it’s one of those things I typically make on a weeknight when I’m feeling lazy and a premade ball of pizza dough is one of those things I try to have on hand at all times.  It’s easy and totally delicious; sort of instant gratification food.

Everytime I make this it prompts BF to poke his head in the kitchen and sniff hopefully asking, “Focaccia?”  I almost always answer in the affirmative.  I am totally guilty of eating too much bread. I like it with pasta, soup, stew, quiche; in short everything.  I think it’s a quick way to bulk up a meal and still keep it delicious.  Admittedly, I’ve been known to make this particular concoction on a weekend afternoon as a snack for watching a movie or just because I want something savory and what’s around doesn’t work for me. 

This is a morph of the breadsticks my mom used to make when we were kids, which were always super crispy and delicious in a denuded pizza kind of way, but this is an entirely different creature.  This focaccia grew up from breadsticks (which I almost always overcooked) and my Chicago Style Deep Dish Pizza with its crispy and delicious bottom.  This is decadent but so-so-so good.  Swoon-worthy.  I keep thinking that someday I will make something on here that takes less than a tablespoon of butter/oil, but what fun would that be?  Eat this fresh from the oven and share it.  It’s simple and fast.

Pie Pan Focaccia Bread
Note: This is not a classic focaccia bread, with the cornmeal and flatness, it’s pretty pouffy.  But that’s ok.  Also it cuts well with kitchen shears if you have them.

1 pre-made pizza dough (I prefer to get it from Russos in Watertown)
2-3 Tbs fresh green scallion pieces, fresh basil bits, or sundried tomatoes (whatever you’re in the mood for)
1 tsp coarse kosher salt (I use Diamond)
1 tsp garlic powder (alternatively use some fresh minced garlic, but the flavor will be harsher)
1 handful of shredded asiago/provolone/mozzeralla cheese
1-2 tbs olive oil

Preheat the oven to a searing hot 450 degrees farenheit.  Pour the olive oil into a deep dish pie plate or round cake pan.  Add the dough ball to this oil coated pan and cover all the dough with oil.  Poke the dough all over so it looks dimpled consistently.  Sprinkle salt, garlic powder, and scallion/basil/tomato on the dough.  Cover with the shredded cheese and toss the whole thing in the oven for 15-20 mins until it’s brown and the cheese is melted.  If you are responsible you will wash the dishes now; if you are me you will probably be more likely to go play a round of Mario Kart or beat level 1-1 in Super Mario Bros 3.  I have an inanimate love, its’ name is Nintendo Wii. I can admit that with pride even. Is anyone else as stoked for PAX East as I am?

Cheddar-Scallion Drop Biscuits

It’s January and I’m in full hibernate mode with soups and stews overloading my stove and palette.  I love them creamy, brothy, rich and thick; I’m there.  One thing I love even more than a good soup is bread to go with it though (see here for an example).  Last year, on an impulse, I bought the Cook’s Illustrated Soups and Stews magazine and found this recipe for drop biscuits.  Its simple, it’s delicious and I am obsessed with these biscuits.

I love biscuits and have since I was a small child. Biscuits meant that there was soup or something delicious to eat, usually slathered in butter.  Then I was obsessed with some Pillsbury ultra flaky ones that peeled apart into layers (which I may have loved simply by dint of the fact that they looked like pages stacked together and baked).  But as I (and my palette) grew up and learned more about baking I grew away from the Pillsbury biscuits in a tube and started to look for a perfect biscuit recipe.  My sister obsessively made some from The Joy of Cooking but I found them a bit dry and wasn’t a fan.  So I kept searching.

I got this issue of Cooks Illustrated for the ramen recipe (which I still haven’t tried; I really need to get some good miso) but instead found this little gem regarding perfect drop biscuits.  I tried it, thinking that at worst it would cost me some flour and buttermilk.  These were perfect, flaky and chewy without being messy or crumby.  These are flexible; I used them later to make shortcakes by adding some extra sugar and cinnamon and I almost always add a handful of good quality cheddar cheese and a few spices.  I love a recipe that is flexible like this and will move to be whatever I want.  Also there is none of that classic cutting butter in.  An ingenious method involving melted butter and really cold butter milk makes really consistent butter chunks evenly distributed into a simple flour mixture.

Cheddar-Chive Drop Biscuits
Adapted from Cook’s Illustrated: Soups & Stews


2 cups flour
2 tsp baking powder
1 tsp sugar
3/4 tsp salt
1/2 tsp baking soda
1/4 cup scallions, chopped finely
1/2 cup good quality cheddar cheese (I used Cabot)
1 cup buttermilk (straight from the fridge and v cold)
1 stick (8 Tbs) butter, melted and allowed to cool a little bit

Preheat the oven to 475 degrees Fahrenheit.  Add the flour, baking powder, sugar, salt, baking soda, scallions, and cheese to a large bowl and whisk them until evenly mixed (5-6) stirs.  In a separate bowl, or a 2 cup measuring cup, mix together the melted butter and buttermilk.  It will look lumpy and it will not be pretty, that’s ok.  It will taste delicious.  Add the butter/buttermilk to the dry ingredients and stir with a fork until just mixed, again 5-6 stirs.  Scoop out the biscuits onto a parchment lined baking sheet. Brush some additional melted butter or some milk on top of the biscuits or sprinkle some extra cheese on there.  Bake them for 10-12 mins.  They will be a light golden brown and totally delicious.  Enjoy these biscuits with whatever you want; I like mine at breakfast with an egg and some hollandaise or served with whatever soup I’ve made most recently.  Perfect.