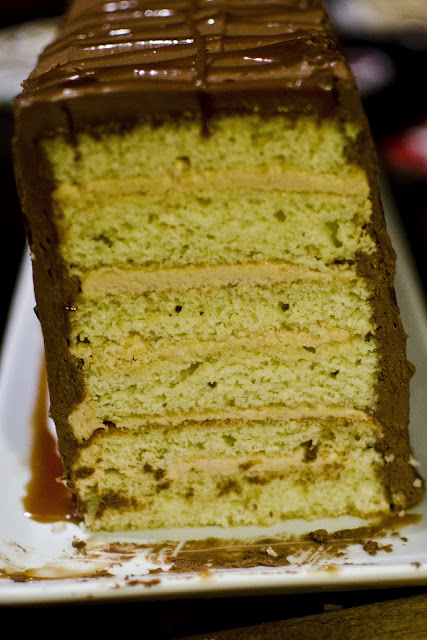
Six Layer Salted Caramel and Chocolate Truffle Cream Cake

Thanks for the picture Rachel!

I wasn’t going to post this recipe initially.  The cake recipe is an old one (a favorite that I use all the time) and the salted caramel frosting is directly from another blog – but BF told me I needed to share it because a six layer confection of frosting and cake should be shared.  Because I hadn’t initially meant to blog this there are only pictures of the cake as it was built, but don’t worry about that.  Marvel at the cake – six layers of yellow cake, salted caramel frosting sandwiched between each layer, coated with decadent chocolate truffle cream frosting, and topped with drizzles of caramel sauce.

I had been playing with the idea for this cake for quite a while – it’s a take on Smith Island cake, which just had chocolate frosting and filling.  But BF isn’t the biggest fan of that much chocolate and I’ve been wanting to make salted caramel frosting, so it seemed a natural fit.  I made this cake to bring over to Rachel and Joel’s as a pairing with a fantastic meal of braised lamb shanks and potatoes au gratin.  Which meant I baked all day and left an obscene amount of dishes in the sink.  But it was worth it.

I am one of those people that will bake to soothe whatever stress I’m under, whether it be in relation to job-hunting or doing my taxes, baking calms me down.  So on Saturday, while BF struggled with his taxes and I paced impatiently from the kitchen to the office and back again, I baked a cake, I made two different kinds of frosting, and I fell in love with salted caramel sauce all over again.  As I watched sugar melt and boil to a beautiful amber color and hoped against hope that it would come out right this time I fell into a state of ease – I shook off the tension of the week and indulged in a cake scrap drizzled with caramel sauce.  So perfect, so confidence inducing, so satisfying to see a pot of caramel and say, “yeah, I did that, TWICE.”

Let us not forget the chocolate truffle frosting, either.  This frosting is sort of a mantra for my mom who tells me that it is THE chocolate frosting I must make if I’m looking for it.  My mom found this frosting about nine-and-a-half years ago, while she was pregnant with ‘Tonio and swore she wouldn’t ever make another one.  I tend to agree with her – it’s fantastic, decadent without being too sweet, and rich without being overpowering.  It paired perfectly with the salted caramel frosting.  Now if only we all had enough room to eat a whole 3″x14″ six layer cake, instead we all had thin slices and cursed the epic amount of cake I made.  Oops.

Six Layer Cake with Salted Caramel frosting and Chocolate Truffle Cream Frosting
The cake is all my design!  The cake recipe I used is one I put up here a long time ago.  The salted caramel frosting is from this post, over on My Baking Addiction, I made just the caramel sauce to put on top too.

Chocolate Truffle Cream Frosting
Adapted from the Joy of Cooking
This recipe makes enough to frost and fill a two layer cake.

4 egg yolks
1/4 cup sugar
1 tsp espresso (1 tsp espresso powder + 1 tsp boiling water works)
1/3 cup boiling water
6 oz finely chopped chocolate (about a cup)
8 Tbs unsalted butter

In a wide heat-proof bowl (I use a shallow metal bowl) whisk together the yolks, sugar and espresso until fully combined and frothy, about 30 seconds.  Add the boiling water 1-2 Tbs at a time, whisking between additions, until fully incorporated.  Place a bowl in a frying pan with at least an inch of water in it (the idea here is basically a wide flat double boiler).  Bring the egg, sugar, espresso, water mixture to a temperature of 160 degrees, stirring occasionally, and remove it from the heat.  Add the chocolate and butter, mix until smooth.  If you find that the chocolate/butter aren’t melting you can put them back in the pan with water in it (turned off, the water should still be warm enough to melt chocolate).  Allow the frosting to cool, in the fridge, fro about twenty minutes if you want to use it as a spreadable frosting.  Or just pour it over your cake if you just want a glaze.  Enjoy.

Assembly


This cake was a bit tricky for me, in that I created the whole thing specifically for a platter I had in mind, hence it’s Kit-Kat like appearance.  This meant cooking the cake in cookie sheets/jelly roll pans and then cutting each sheet of cake down to a specific size, in this case 3″x14″.  I found that cutting the cake down to be uniform sizes was the hardest part, mostly because I just can’t cut in a straight line.  Regardless, when all of your cake pieces are uniform (or you think they are) stack them to make sure.  Then you can start the real assembly.  It’s best to have both frostings all ready when assembling, then you don’t have to stop.  Start with a cake on the bottom then add a hefty amount of caramel frosting – I found that one recipe made just enough for me to fill between the layers. Smooth out the frosting then add another layer of cake, continue to alternate until it looks like the “image” below:

Cake
Caramel Frosting
Cake
Caramel Frosting
Cake
Caramel Frosting
Cake
Caramel frosting
Cake
Caramel frosting
Cake
There should be cake on the top and bottom of the whole thing.  After you have filled the cake go around the edges with an offset spatula (if you have one, I used a butter knife).  Then coat the whole cake in chocolate frosting. If you made the above frosting (which I can’t recommend highly enough) then you should have enough for about 1/8inch think frosting over the whole cake.  You should check out Test Kitchen for tips on cake frosting, they’re awesome.  Last of all, top the whole cake with a drizzle of caramel sauce in whatever pattern you want.  Adding this caramel helps tone down the richness of everything else and is an important step, don’t skip it.  Then take this massive cake and share it, with at least ten other friends.  You will want to eat it all by yourself, this is a bad idea.  Also, taking it on a long, packed train/bus ride is not a good idea.  Trust me, I tried it, the cake got, well, smooshed.

Fried Chicken, for Breakfast

I had my first experience with chicken and waffles on Easter Sunday 2011.  BF’s family was visiting and in lieu of having a big Easter dinner we opted for brunch so they could drive the four hours home afterwards.  I did some research and narrowed our choices down to four – The Biltmore, Russel House Tavern, East Coast Grill, and Lord Hobo.  Ultimately we went for The Biltmore which was perfect.  Lots of natural light a decent bloody mary and, oh yeah, CHICKEN AND WAFFLES.  Two full sized waffles and what looked like half a chicken graced my plate that morning, I barely ate half of it but it gave me a brunch epiphany.

See, before this eye-opening brunch I hadn’t really considered chicken and waffles an option – I thought it seemed like a weird slightly off-putting combination because I’ve always been a fried chicken and savory sauces kind of girl.  As soon as I tried that crisp chicken skin and tender waffle piled together and doused in maple syrup, I knew – this was my kind of brunch meal.  This is savory and sweet without being too much of either, it’s decadent – so eating it feels like a celebration and it pairs perfectly with a bloody mary.

So I tried it on a Saturday morning when B came over for brunch.  She made the waffles (pumpkin-yogurt ones, recipe coming soon), I dredged and fried the chicken, and BF made the bloody marys.  We ended our meal completely stuffed and thankful our most strenuous activity for the rest of the day was putting together a puzzle and chatting.  Saturday should always be full of good food, great friends, and relaxation I think.  I sent B home with enough leftovers so that she had dinner later and was able to still have enough at home so BF and I could as well, we ate it all that night.

I won’t lie.  Fried chicken takes patience, also an instant read thermometer, but it’s worth it.  that crisp crust and soft fall apart chicken is one of the greatest things in the world.  Paired with a good (grade B) maple syrup and a perfect bloody mary it’s breakfast heaven.  True. Story.


Fried Chicken
Adapted from Bon Appetit February 2012 issue.
Note:  This recipe makes one full 3 lb chicken, but I just used thighs because, while I can butcher a full chicken I’m not very good at it.  So I got three pounds of bone-in thighs instead.  This worked perfectly.  I  also subbed in one cup of whole wheat flour for the regular in the dredge, I ran out of all purpose, and it worked great – I’ll probably do it again.

1 3 lb whole chicken, or 3 lbs chicken pieces, either way it needs to be bone-in

Dry Rub
1 Tbs coarse kosher salt
2 tsp fresh cracked pepper
1 1/2 tsp paprika
3/4 tsp cayenne pepper (don’t worry these aren’t spicy)
1/2 tsp garlic powder
1/2 tsp onion powder

Dredge
1 cup buttermilk
1 large egg
1/2 cup water
2 cups all-purpose flour
1 cup whole wheat flour
1 Tbs cornstarch
1 Tbs kosher salt
1 Tbs fresh cracked black pepper

The night before breakfast – create the dry rub by mixing all of the ingredients together.  Rub the chicken pieces evenly with the rub and set them in a covered bowl in the fridge overnight.

The morning of breakfast – pull your chicken out of the fridge an hour before cooking to allow it to come to room temperature, so it doesn’t drop the oil temp too much.  In a bowl combine the buttermilk, egg, and water – whisk until well combined. In a second wide flat bowl (I used a pie pan and it worked great) combine the flours, cornstarch, salt, and pepper – you can sift these together to combine them or just give them a gentle whisk to get everything evenly blended.  In a large cast iron skillet (I used my enameled dutch oven and it was wonderful) bring about 3/4″ of your preferred brand of frying oil (BA recommends peanut, I like safflower) up to 325-350 degrees Fahrenheit (I used my candy thermometer, but any deep frying thermometer will work). Remember to check your oil temp periodically throughout cooking to make sure it is staying consistent, it may get a little high or low depending on the temp of your chicken.  When your oil is heated and your chicken is not cold start the dredge. You should try to maintain the same hand for each dip – one hand for chicken to liquid to flour, the other had for flour to oil – trust me this will make the process much tidier.  Dip each piece of chicken completely in the liquid mixture then the flour mixture, make sure to fully coat each piece.  Place the chicken gently in the hot oil one piece at a time – Do Not Crowd the pan – I cooked about three thighs at once, anymore and the chicken would have been touching.  Turn each piece of chicken every 1-2 minutes, to ensure even crisping and brownness until an instant read thermometer shows an internal temperature or 165, about 12 minutes.  Move the chicken to a draining rack to cool for a couple minutes (three is good) then serve with warm maple syrup.  Delicious.  This is definitely a meal to share.  Enjoy!

Hazelnut-Chocolate Biscotti

I love to make homemade food gifts.  I find it rewarding to give someone something I made from scratch specifically for them.  One of my best friends and I were preparing to swap Christmas gifts and had both decided that homemade was the way to go.  So I started hunting for recipes.  I had initially wanted to make biscotti for my step dad as a Christmas present, but he was on a diet – the idea for homemade biscotti lingered though.  I went through all of my cookbooks searching and narrowing recipes for the delectable coffee pairing until I found the one that would be perfect for B.  A cinnamon-chip biscotti was calling my name.  I swapped in some chocolate chips for the cinnamon and I was good to go.

 I have a confession to make – I don’t really care for biscotti, I find it too dry and hard most of the time, leaving me with a sore roof of the mouth and an unpleasant after taste.  But homemade biscotti is entirely a horse of a different color, it’s tender while still firm and left me craving more with every bite.  B loved it – or said she did to save my feelings 😛 But in all seriousness there are some things I will change about my next batch – I’ll coarsely chop the hazelnuts because whole was just too much and I’ll leave out the chocolate chips – they were delicious but they also made it just not pretty.  I’ll just dip them in ganache next time instead, besides that will give a better cookie to chocolate ratio.

Regardless – you should probably take an afternoon and make these, soon.  They’re that good.  Like overgrown chocolate-chip cookies and they’re just perfect with a good cup of coffee.  Perfect.

Hazelnut-Chocolate Chip Biscotti
Adapted from Baked: New Frontiers in Baking by Matt Lewis and Renato Poliafito which I borrowed from Megan and love!
Note: The original recipe calls for cinnamon but I really wanted a Nutella feel to these so I omitted the cinnamon.  I also cooked mine for slightly less time than they called for because I prefer a more tender biscotti.  Also, the original recipe calls makes 24 huge biscotti – I would make them a bit smaller next time and have changed the recipe below to indicate that.  I also nixed brushing egg whites on top of the fully cooked biscotti log before drying them.  It felt unneccessary to me and mine were toally fine without it.

1 1/3 cup sugar
1 1/4 tsp baking powder
1 1/4 tsp salt
4 large eggs
2 tsp vanilla
3 1/4 cups flour
1 1/2 cup blanched hazelnuts,  toasted and coarsely chopped
1 3/4 cups semisweet chocolate chips (optional)

Preheat the oven to 350 degrees and line a large baking sheet with parchment.  In a small bowl whisk/sift the sugar, baking powder and salt until fluffy.  In the bowl of an electric mixer cream the eggs and sugar mixture together until it’s ribbony – about 45-60 seconds. Add the vanilla and beat until incorporated – 5-10 seconds. Add one half of the flour and beat to combine.  Add the second half of the flour – mix until everything is just combined – about 30 seconds.  Add the nuts and chips (if using) on low speed, mix until evenly distributed.  Turn the dough out onto the parchment lined baking sheet and separate it.  Shape one log into a 12 inch log 2 inches across and 3/4 inch think.  Do the same thing with the other log on another baking sheet.  Bake the logs for 20-25 mins, until firm to the touch but not hard (I cooked mine about 18), then let them cool on the pan for 10 mins or so, until handle-able.  Lower the oven temperature to 325 degrees.  Cut the logs into 1/2-3/4 inch slices, however wide you like your biscotti, I’m more on the half inch side myself.  Lay the sliced biscotti back on the baking sheets cut sides up/down  and bake them for 20-25 mins, until they are firm (again if you want more tender biscotti don’t cook them as long on this step, 18 mins is what I did).  After the biscotti are cooked remove them from the oven and let them cool fro at least five minutes on the pan before transferring them to a wire rack.  Let the cookies cool completely before eating/storing them.  These will keep for about two weeks in  an airtight container.  They are fantastic dipped in a jar of Nutella for dessert.